CheckBox dan RadioButton
1. Kita buat Form Baru, dengan nama FrmcheckBox
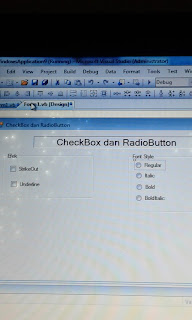
2.Desain Tampilan form seperti gambar berikut ini

3.Tambahkan kontrol ke form seperti pada gambar diatas dan atur propertinya seperti tabel berikut:
Object
|
Properties
|
Nilai
|
Form1
|
Name
Text
|
Frmcheckbox
CheckBox dan RadioButton
|
Label1
|
Name
|
Lbl_Font
|
Autosize
BorderStyle
Font
TextAlign
Text
|
False
Fixed3D
Microsoft Sans Serif, 16
Center
CheckBox dan RadioButton
| |
GroupBox1
|
Text
|
Efek
|
GroupBox2
|
Text
|
Font Style
|
CheckBox1
|
Text
|
StrikeOut
|
CheckBox2
|
Text
|
Underline
|
RadioButton1
|
Text
|
Regular
|
RadioButton2
|
Text
|
Italic
|
RadioButton3
|
Text
|
Bold
|
RadioButton4
|
Text
|
BoldItalic
|
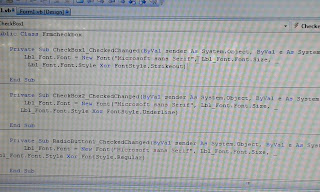
4.. Klik ganda pada CheckBox1, kemudian ketikkan kode program berikut ini :
Private Sub CheckBox1_CheckedChanged(ByVal sender As System.Object, ByVal e As System.EventArgs) Handles CheckBox1.CheckedChanged
Lbl_Font.Font = New Font("Microsoft sans Serif", Lbl_Font.Font.Size, _
Lbl_Font.Font.Style Xor FontStyle.Strikeout)
End Sub
5. Klik ganda pada CheckBox2, kemudian ketikkan kode program berikut ini :
Private Sub CheckBox2_CheckedChanged(ByVal sender As System.Object, ByVal e As System.EventArgs) Handles CheckBox2.CheckedChanged
Lbl_Font.Font = New Font("Microsoft sans Serif", Lbl_Font.Font.Size, _
Lbl_Font.Font.Style Xor FontStyle.Underline)
End Sub
6 Klik ganda pada RadioButton1, kemudian ketikkan kode program berikut ini :
Private Sub RadioButton1_CheckedChanged(ByVal sender As System.Object, ByVal e As System.EventArgs) Handles RadioButton1.CheckedChanged
Lbl_Font.Font = New Font("Microsoft sans Serif", Lbl_Font.Font.Size, _
Lbl_Font.Font.Style Xor FontStyle.Regular)
End Sub
7. Klik ganda pada RadioButton2, kemudian ketikkan kode program berikut ini :
Private Sub RadioButton2_CheckedChanged(ByVal sender As System.Object, ByVal e As System.EventArgs) Handles RadioButton2.CheckedChanged
Lbl_Font.Font = New Font("Microsoft sans Serif", Lbl_Font.Font.Size, _
Lbl_Font.Font.Style Xor FontStyle.Italic)
End Sub
8. Klik ganda pada RadioButton3, kemudian ketikkan kode program berikut ini :
Private Sub RadioButton3_CheckedChanged(ByVal sender As System.Object, ByVal e As System.EventArgs) Handles RadioButton3.CheckedChanged
Lbl_Font.Font = New Font("Microsoft sans Serif", _
Lbl_Font.Font.Size, Lbl_Font.Font.Style Xor FontStyle.Bold)
End Sub
9. Klik ganda pada RadioButton4, kemudian ketikkan kode program berikut ini :
Private Sub RadioButton4_CheckedChanged(ByVal sender As System.Object, ByVal e As System.EventArgs) Handles RadioButton4.CheckedChanged
Lbl_Font.Font = New Font("Microsoft sans Serif", _
Lbl_Font.Font.Size, Lbl_Font.Font.Style Xor FontStyle.Bold Xor FontStyle.Italic)
End Sub


jika kita klik salah sati icon misalnya , Underline maka CheckBox dan RadioButton yang kita buat tadi pada label 1 akan digaris bawahi ( Underline)
ComboBox dan ListBox
1. 1. Tambahkan
Form baru, dengan dengan cara klik kanan pada Project. Klik Add, pilih Windows
Form … . Beri nama FrmCombo
2. Buatlah
desain Tampilan form seperti gambar berikut ini :
1. 2 Tambahkan
kontrol ke form seperti pada gambar diatas dan atur propertinya seperti tabel
berikut:
Object
|
Properties
|
Nilai
|
Form2
|
Name
Text
Start
Position
|
FrmCombo
ComboBox
dan ListBox
CenterScreen
|
Label1
|
Text
|
Drive
|
Label2
|
Text
|
Keterangan
|
ComboBox1
|
Name
|
Cmb_Drive
|
ListBox1
|
Name
|
LstInfo
|
2. 4. Klik
icon view code pada solution Explorer, di atas Public Class Form1, ketikkan
kode program berikut ini :
Imports
System.IO
Public Class Form2
3. 5. Klik ganda pada form, kemudian ketikkan kode
program berikut ini :
Private Sub FrmCombo_Load(ByVal sender As System.Object, ByVal
e As System.EventArgs) Handles
MyBase.Load
Cmb_Drive.Items.AddRange(IO.DriveInfo.GetDrives)
End Sub
4. 6. Klik
ganda pada ComboBox, Kemudian ketik kode program berikut ini :
Private Sub Cmb_Drive_SelectedIndexChanged(ByVal sender As
System.Object, ByVal e As
System.EventArgs) Handles
Cmb_Drive.SelectedIndexChanged
LstInfo.Items.Clear()
LstInfo.Items.Add("Nama Drive :"
& Dir("" & _
Cmb_Drive.Text
& "", FileAttribute.Volume)
& "")
LstInfo.Items.Add("System :"
& Dir("" & _
Cmb_Drive.Text
& "", FileAttribute.System)
& "")
Dim dvr As New DriveInfo(Cmb_Drive.Text)
Dim kapasitas = CStr(dvr.TotalSize
/ 1000000) & " MB"
Dim sisa = CStr(dvr.TotalFreeSpace
/ 1000000) & " MB"
Dim Terpakai
= CStr(Val(kapasitas) - Val(sisa)) & " MB"
LstInfo.Items.Add("Kapasitas : "
& kapasitas)
LstInfo.Items.Add("Terpakai : " & Terpakai)
LstInfo.Items.Add("Sisa : " & sisa)
End Sub
Timer dan DateTimePicker
1. Tambahkan
Form baru, dengan dengan cara klik kanan pada Project. Klik Add, pilih Windows
Form … . Beri nama FrmTimer
2. Buatlah
desain Tampilan form seperti gambar berikut ini :
3. Tambahkan
kontrol ke form seperti pada gambar diatas dan atur propertinya seperti tabel
berikut:
Object
|
Properties
|
Nilai
|
Form3
|
Name
Text
Start
Position
|
FrmTimer
Timer
dan DateTimePicker
CenterScreen
|
Label1
|
Name
|
Lbl12jam
|
Label2
|
Name
|
Lbl24jam
|
DateTimePicker1
|
Name
|
Dtanggal
|
Timer1
|
Enable
Interval
|
True
1000
|
4. Klik
ganda pada form, ketikkan kode program berikut ini :
Private Sub FrmTimer_Load(ByVal sender As
System.Object, ByVal e As
System.EventArgs) Handles MyBase.Load
DTtanggal.Format =
DateTimePickerFormat.Custom
DTtanggal.CustomFormat
= "dddd,dd/MM/yyyy"
DTtanggal.Value =
Format(Now)
End Sub
5. Klik
ganda pada Timer1, ketikkan kode program berikut ini :
Private Sub Timer1_Tick(ByVal
sender As System.Object, ByVal e As
System.EventArgs) Handles Timer1.Tick
Lbl12Jam.Text =
Format(Now, "h:mm:ss tt")
Lbl24Jam.Text =
Format(Now, "hh:mm:ss")
End Sub
yuk tonton videonya :
Latihan-5 :
MenuStrip, ContextMenuStrip dan RichTextBox
1.
Tambahkan Form baru, dengan
dengan cara klik kanan pada Project.
Klik Add, pilih Windows Form … . Beri nama FrmMenu
2. Buatlah desain Tampilan form seperti gambar
berikut ini :
3. Tambahkan
menuStrip seperti pada form di atas
4.Tambahkan
kontrol ke form seperti pada gambar diatas dan atur propertinya seperti tabel
berikut:
Object
|
Properties
|
Nilai
|
Form1
|
Name
Text
Start
Position
|
FrmMenu
NotePad
CenterScreen
|
MenuStrip1
|
Name
|
MenuStrip1
|
RichTextBox1
|
Name
ContextMenuStrip
|
RchTeks
ContextMenuStrip1
|
ContextMenuStrip1
|
Name
|
ContextMenuStrip1
|
.5 Klik
ganda pada menu buka, ketikkan kode program berikut ini :
Private Sub BukaToolStripMenuItem_Click(ByVal sender As
System.Object, ByVal e As
System.EventArgs) Handles
BukaToolStripMenuItem.Click
Dim kotak_dialog As
OpenFileDialog = New OpenFileDialog
kotak_dialog.Filter = "File Text
(*.txt) | *.txt"
kotak_dialog.ShowDialog()
Dim fileText As String =My.Computer.FileSystem.ReadAllText(kotak_dialog.FileName)
RchTeks.Text =
fileText
End Sub
6. Klik
ganda pada menu simpan, ketikkan kode program berikut ini :
Private Sub SimpanToolStripMenuItem_Click(ByVal sender As
System.Object, ByVal e As
System.EventArgs) Handles
SimpanToolStripMenuItem.Click
Dim kotak_dialog As
SaveFileDialog = New SaveFileDialog
kotak_dialog.Filter = "File Text
(*.txt) | *.txt"
kotak_dialog.ShowDialog()
My.Computer.FileSystem.WriteAllText("" & kotak_dialog.FileName & "",RchTeks.Text, False)
End Sub
7. Klik
ganda pada menu Baru, ketikkan kode program berikut ini :
Private Sub BaruToolStripMenuItem_Click(ByVal sender As
System.Object, ByVal e As
System.EventArgs) Handles
BaruToolStripMenuItem.Click
RchTeks.Text = ""
End Sub
8. Klik
ganda pada menu ContextMenuStrip dengan
menu regular, kemudian ketik kode program berikut ini :
Private Sub RegularToolStripMenuItem_Click(ByVal sender As
System.Object, ByVal e As
System.EventArgs) Handles RegularToolStripMenuItem.Click
RchTeks.SelectionFont = New
Font(RchTeks.SelectionFont, FontStyle.Regular)
End Sub
9. Klik
ganda pada menu ContextMenuStrip dengan menu Bold, kemudian ketik kode program
berikut ini :
Private Sub BoldToolStripMenuItem_Click(ByVal sender As
System.Object, ByVal e As
System.EventArgs) Handles
BoldToolStripMenuItem.Click
RchTeks.SelectionFont = New
Font(RchTeks.SelectionFont, FontStyle.Bold)
End Sub


No comments:
Post a Comment